Lowest prices guaranteed
 on shutters and louvre doors
 Family run business
 since 1999
 Same day dispatch
 on stock louvre doors
 Buy direct from the UK's
No.1 Manufacturer
Lowest prices guaranteed
Family run business
Same day dispatch
Buy direct from the UK's
Lowest prices guaranteed
Family run business
Same day dispatch
Buy direct from the UK's
Position the shutter next to the window to be dressed and mark the location on the wall by making an ‘L’shapedlinewithapencilateachouter corner.
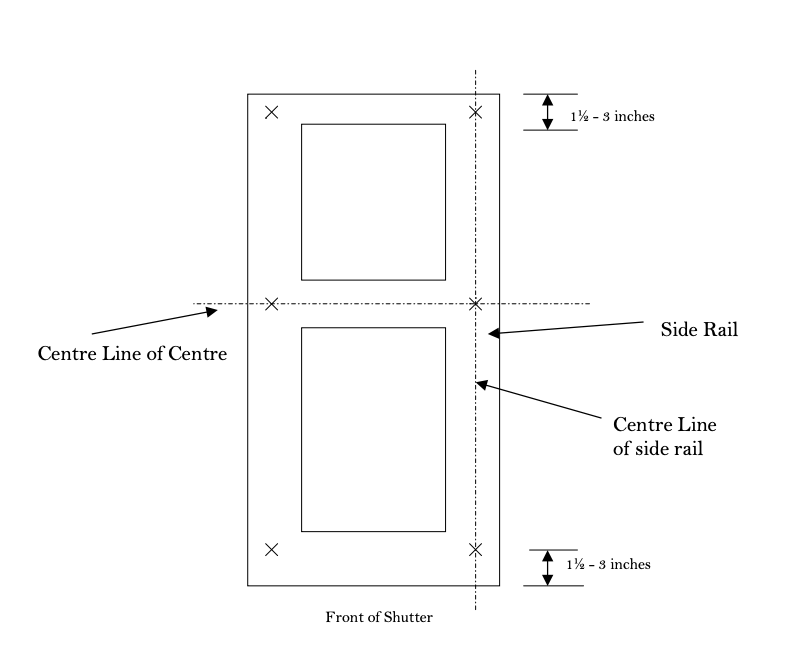
Lay the shutter face up on a clean flat surface, preferably a piece of plywood, for drilling purposes and mark the locations of the fixing points.
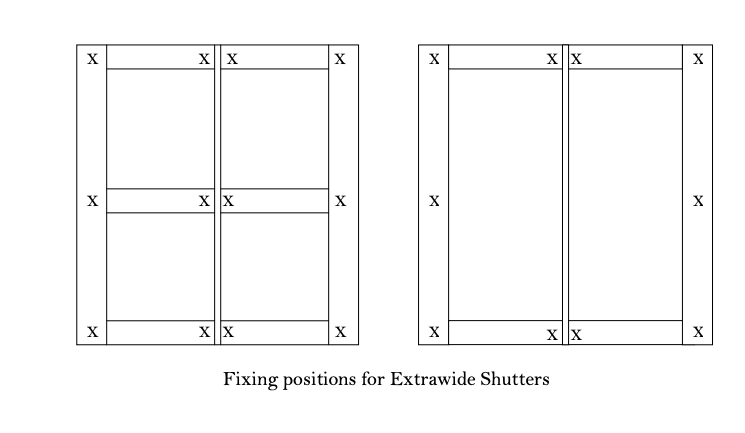
Each fixing point should be approximately 1½ to 2½ inches in from each corner and in the centre of each side rail. Try to avoid the rail support brace at the back of the rail. Also mark two fixing points in the centre of each side rail halfway up the shutter and in line with the other points.
Using a bradawl or sharp nail make a small hole at each fixing location to prevent the drill bit from slipping when you drill the holes.
Shutter Spikes
Screws
Drill a 6.5 mm/¼inch hole through the shutter at each point using a high speed (HSS) metal drill bit.
Using a punch or other suitable marker mark the mounting hole locations on the building. Should the shutter slip whilst you are doing this you can re-align it by using the‘L’shapedmarksyoufirstmadewitha pencil to ensure that the shutter is positioned correctly.
Drill a 6/6.3mm hole into the wall at least 2½ inches deep using a masonry drill bit. You can shorten the spikes by up to ½ inch by snipping off the end. Clear away the dust in the hole. Test that the hole is not too big for the spike. If it is, use a matchstick or sliver of wood to bracket the spike to take up the slack in the hole.
Position all six shutter spikes in the shutter by using a twisting action to assist you. They will be a tight fit but will push through. Locate each spike in the holes in the masonry and gently tap them in. Tap them in far enough so that the underside of the spike head almost touches the shutter when the back of the shutter is flush with the building. Leave a 1mm gap between the underside of the spike head and the shutter to allow for expansion.
Should the shutter need to be removed at any time the shaft of the spike can be cut using snips or a thin blade (between the shutter and the wall) and the core remaining within the wall can be quickly drilled out with a smaller drill piece ready to accommodate a new spike. Replacement spikes can be ordered at a nominal cost.
Drill a hole smaller than the head of the screw being used at each location using a high speed metal (HSS) drill bit.
Using a punch or other suitable marker mark the mounting hole locations on the building. Should the shutter slip whilst you are doing this you can re-align it by using the marks you first made with a pencil to ensure that the shutter is positioned correctly.
Using a masonry drill bit make a hole of a suitable size and depth to accommodate a wall anchor. Make sure that you drill the hole deep enough for the screw being used. Make sure that the anchor fits snugly and is not loose within the hole.
Position the shutter back on to the building and tighten the screws. Be sure not to over tighten the screws,as this will cause the rail to‘dimple’. Leave at least 1mm clearance from the underside of the screw head to the face of the shutter when the shutter is flush with the building to allow for expansion
Coloured through co-polymer vinyl shutters cannot be painted. There is a specially designed paintable product available for custom colour requirements.