 Lowest prices guaranteed
 on shutters and louvre doors
 Family run business
 since 1999
 Same day dispatch
 on stock louvre doors
 Buy direct from the UK's
No.1 Manufacturer
Lowest prices guaranteed
Family run business
Same day dispatch
Buy direct from the UK's
Lowest prices guaranteed
Family run business
Same day dispatch
Buy direct from the UK's
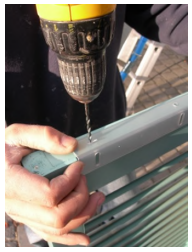
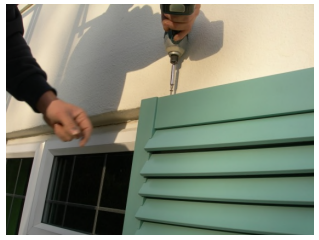
If using: Installation brackets.
First insert the wall mounting screws and washers through the slots on one installation bracket and position it along the bottom edge of the shutter. Mark the locations of each hole that are to be drilled for the screws that will secure the shutter to the bracket. The locations of the holes & slots may differ marginally from bracket to bracket so do not use one bracket to mark the holes in every shutter. Using a fine HSS drill bit suitable for the screws supplied drill the pilot/locating holes. Do the same for the top edge.
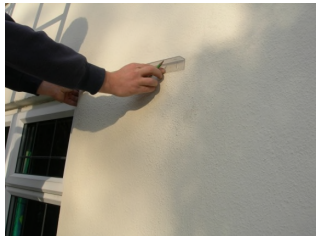
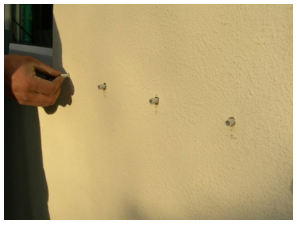
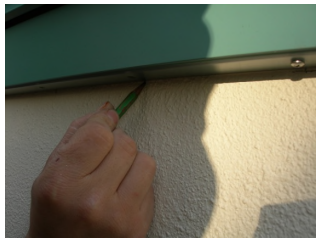
Position the shutter on the wall so that it is parallel with the reveal edge and mark the location on the wall at the bottom corners. Now position the bottom bracket on to the wall to align with the marks that you made. Make new marks for the holes in the wall through the slots in the bracket. The slots are to allow for movement (contraction & expansion) as well as fine positioning. Using a #8 masonry drill bit, drill the holes in the wall.
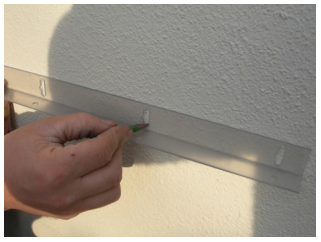
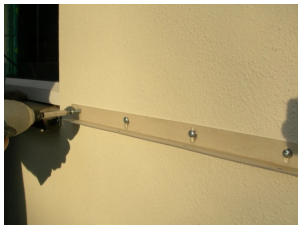
Place the wall anchors in the holes and screw home. As it is this bottom bracket that will be taking the weight of the shutter make sure that you have a firm and secure fixing. Use washers provided.
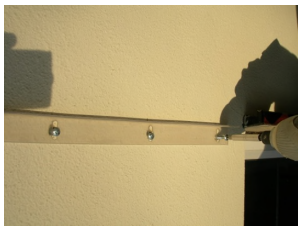
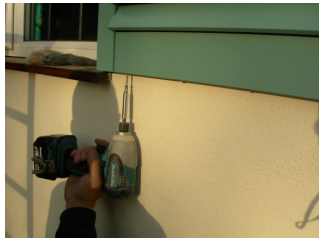
Sit the shutter onto the bracket and adjust so that the shutter is parallel with the window reveal. Now place the top bracket on the shutter and mark the location on the wall. Remove the shutter and reposition the top bracket with the marks that you made. Mark the locations for the holes into the wall and drill suitable holes for the wall anchors/ wall plugs to be inserted. Insert wall anchors and screw home with the screws provided. It is important that the top bracket is not over tightened and is allowed to move freely along the slots behind the screw heads to allow for the expansion and contraction of the shutters. Use washers provided.
For shutters over 50” tall we recommend a central fixing on either side. Use the small ‘L’ shaped pieces of angle bracket supplied and fix to the wall so one leg of the angle bracket will be hidden behind the shutter. After step 6, attach the protruding leg to the stile (side frame) with small #6 x ¾” stainless steel screws supplied. Always pre drill pilot holes to prevent cracking.
Reposition the shutter so that the pre-drilled holes that you made in the edge of the shutter line up with the holes in the brackets as explained in instruction #1. Use the smaller screws to screw into the shutter from above. Do not over tighten the screws.
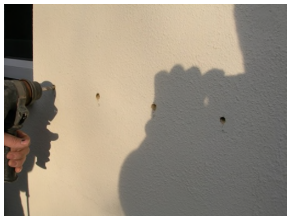
Using an HSS drill bit, drill a fine pilot hole and enlarge to a suitably sized hole in each corner of the shutter. The hole must be big enough to allow the shank of the screw (#10 / 3” stainless steel screws supplied) to pass through but not the head.
Position the shutter on the wall and mark the location of each hole in the shutter onto the wall.
Using a no. 8 (1/4 inch) masonry drill bit drill the holes in the wall and locate the wall anchors supplied. Make sure that the holes are deep enough for the screws.
For taller shutters over 50” we recommend using 6 fixings per shutter to minimise the risk of bowing
Position the shutter and screw into the wall anchors making sure not to over tighten the screws (we suggest that you leave up to1mm clearance), as the shutter needs some clearance to expand and contract.
Touch up paint for accidental damage can be supplied when required
Clean only with soapy water and a soft brush or cloth.
For handy tips check out the Articles and FAQ’s pages on our website: www.simplyshutters.co.uk.

Town & Country
‘synthetic wood’ step by step installation guide [hidden brackets only]
Use in conjunction with installation instructions supplied.
