 Lowest prices guaranteed
 on shutters and louvre doors
 Family run business
 since 1999
 Same day dispatch
 on stock louvre doors
 Buy direct from the UK's
No.1 Manufacturer
Lowest prices guaranteed
Family run business
Same day dispatch
Buy direct from the UK's
Lowest prices guaranteed
Family run business
Same day dispatch
Buy direct from the UK's
Please read carefully.
You will need a hammer, drill & a bradawl together with 1/8 inch HSS & 1/4 inch Masonry drill bits
If using decorative hinges please see point 7 before installing the shutters.
Lay the shutter face up on a clean flat surface, preferably a piece of plywood, for drilling purposes.
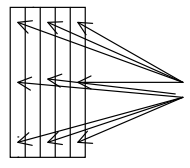
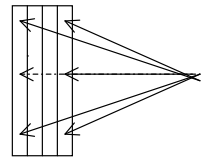
Measure approximately 5½ to 7 inches down from the top and up from the bottom of the shutter (in the centre of the boards) at each corner and make a mark. You can adjust this measurement to suit and is mentioned as a guide only. For 5 board shutters mark the centre board at the top and bottom (in line with the other points). Find the midway point (long axis) on the two outer boards and make a mark. These points will become the fixing positions to the wall. You may find it helpful to make a small hole with a bradle or nail once you are satisfied with the locations to prevent the drill slipping.
Drill a 1/8 inch (4mm / 5mm) diameter hole in the shutter at each of the marked locations using a high speed drill bit (HSS). Wood and masonry bits are not suitable, as they will not givea‘clean’cut.Ensure that the head of the screw covers the hole and does not ‘pull through’.
Position the shutter next to the window and using a punch or other suitable marker (wax crayon/pencil etc.) mark the mounting hole locations on the building.
Using the masonry drill bit, drill a suitable size hole to accommodate the masonry anchor into the masonry/brickwork (approx ¼ inch but adjust size accordingly). If the wall you are drilling is ‘crumbly’ or you are drilling into pointing it may be prudent to try a smaller drill bit as the finished hole may end up being larger than required due to the composition of the wall. Make sure you drill the hole deep enough to prevent the screw from ‘bottoming out’.You will need to insert a masonry anchor or wall plug into the wall and screw in as normal.
Each screw should only go down far enough for the underside of the screw head to almost touch the shutter when the back edge of the shutter is flush with the building. Allow 1mm for clearance and expansion.
If using Country Panel decorative hinges in conjunction with the shutters, the hinges will first need to be secured to the shutters, using the screws provided, prior to installation on the building. The hinges can be cut to the desired length at the flat edge only. New screw fixing points may have to be made in the hinge by using a bradawl or sharp nail. Either try to locate the hinges so that they do not interfere with the mounting points on the shutter or alternatively you can use the longer black-headed screws that are supplied, to fix the shutter to the wall through the hinge.
Please see overleaf for more information.
Country Panel shutters are made of copolymer vinyl that will not fade, warp, crack, peel or blister. As a consequence we support this product by issuing a limited lifetime* or 10 years (whichever the sooner) non transferable warranty on them.
Country Panel shutters offer you all the good looks of wood without the maintenance problems associated with wood.
Because of the type of construction used, Country Panels shutters at first appear to very ‘flimsy’ when held loosely in your hands. This is normal.
Their strength is achieved by placing them on a flat surface such as wall that will support them. Once correctly installed, your Country Panel shutters will provide you with many years of maintenance free service.
Should you have any issues about installation that are not covered in the installation guide overleaf please contact us where we will be happy to offer advice?
Whilst all of our products are designed to be maintenance free, occasional cleaning may be necessary from time to time. Best results are achieved with warm soapy water and a brush.
Simply Shutters thank you for your custom.
* Limited Lifetime warranty means that the shutters are guaranteed for as long as you own them up to a maximum period of 10 years. The guarantee ends when the shutters are transferred to a new owner.
