Lowest prices guaranteed
 on shutters and louvre doors
 Family run business
 since 1999
 Same day dispatch
 on stock louvre doors
 Buy direct from the UK's
No.1 Manufacturer
Lowest prices guaranteed
Family run business
Same day dispatch
Buy direct from the UK's
Lowest prices guaranteed
Family run business
Same day dispatch
Buy direct from the UK's
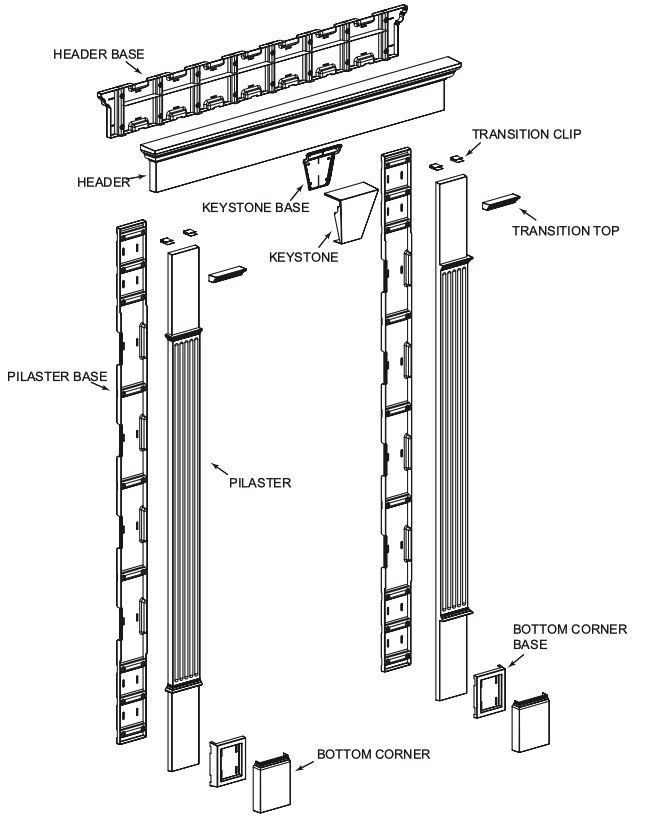
Kit Contains:
2pc. Transition Top (1 Left & 1 Right)
2pc. Pilaster
2pc. Pilaster Base
2pc. Bottom Corner (1 Left & 1 Right)
2pc. Bottom Corner Base
2pc. 24pk. screws
3pc. 12pk. Shutter Lok
4pc. Transition Clip
Additional components required for installation
(not included with this kit):
1pc. 6" or 9" Header
1pc. 6" or 9" Header Base
1pc. 9" Keystone
1pc. 9" Keystone Base
1pc. 6" Keystone
1pc. 6" Keystone Base
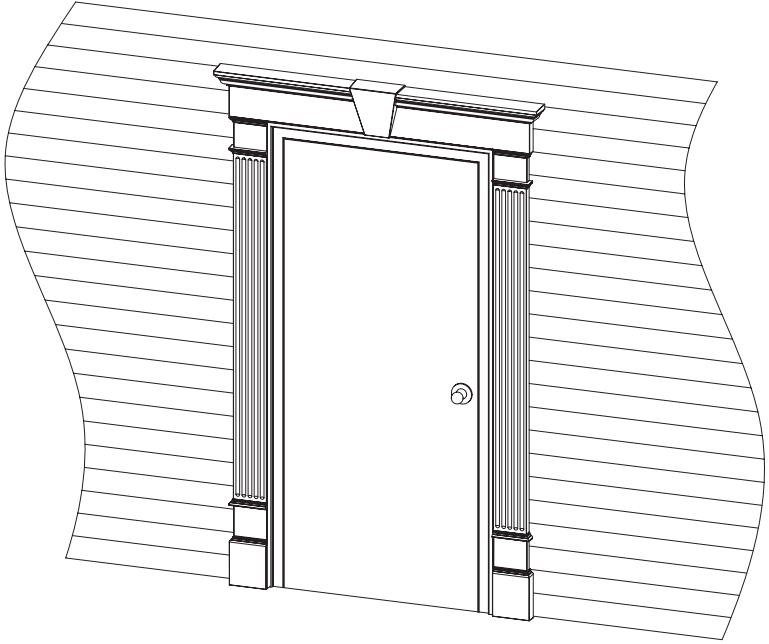
Note: The illustrations contained in these instructions use a 9" Header and Base for examples. A 6" Header and Base can be used just as easily.
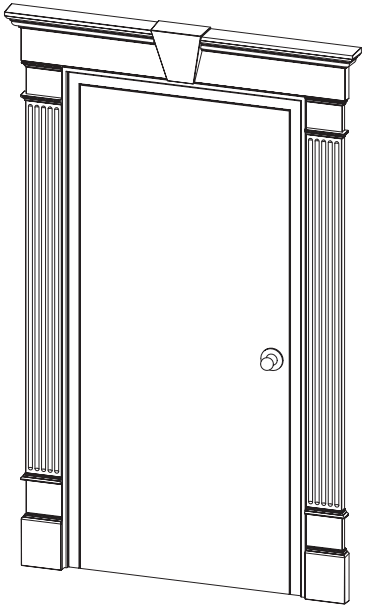
The siding has been removed from the illustrations for clarity purposes.
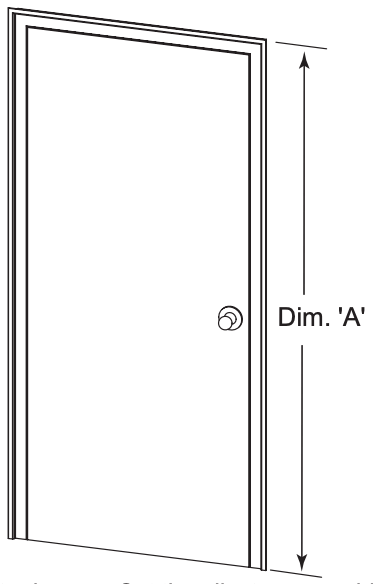
Step 1
Measure the height of the door. This includes any brickmold or trim that may be around the door. Record this as dimension 'A'. See figure at below.
Step 2
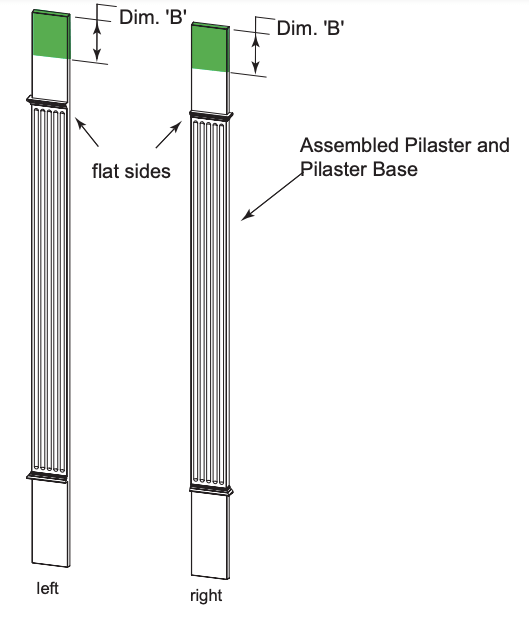
Assemble the pilasters to the pilaster bases. Cut the pilaster assembly from the top so that its finished length is Dim. 'A' minus 1/2". To achieve this, use the following formula:
96" (the length of the pilaster) minus (Dim. 'A' minus 1/2") equals Dim 'B'
Measure and cut Dim. 'B' from the top of both pilasters. See Figure at below. Be sure the pilasters are oriented in the correct position before cutting. The flat side of the pilaster goes against the door.
If Dim 'B' is greater than 12", cut the remaining material off the bottom of the pilaster
Step 3
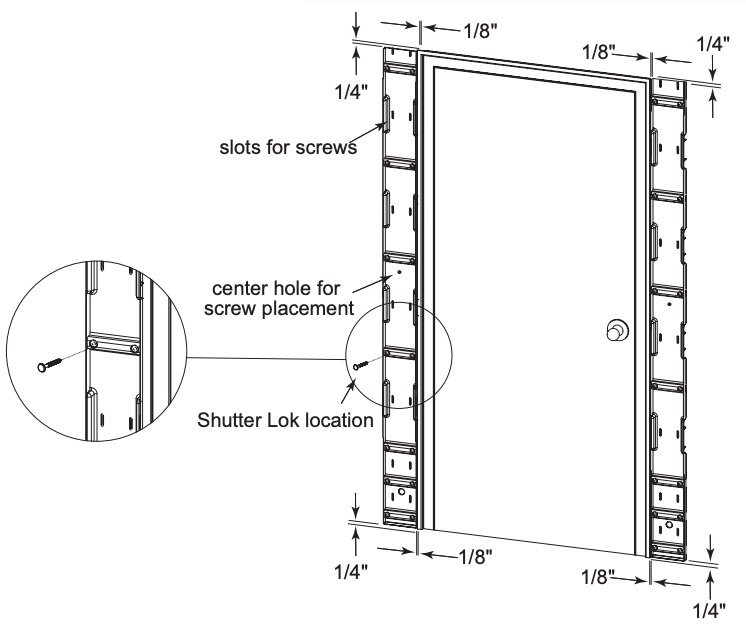
Unsnap the assembly and position the Pilaster Base 1/8" away from the sides of the door and 1/4" away from the bottom of the door. This should leave it 1/4" short from the top of the door. See figure at right.
Step 4
Place a screw (not a Shutter Lok) in the center hole of the Pilaster Base (not in a slot). This insures that the expansion and contraction does not make the Pilaster creep up or down. See figure at right.
Step 5
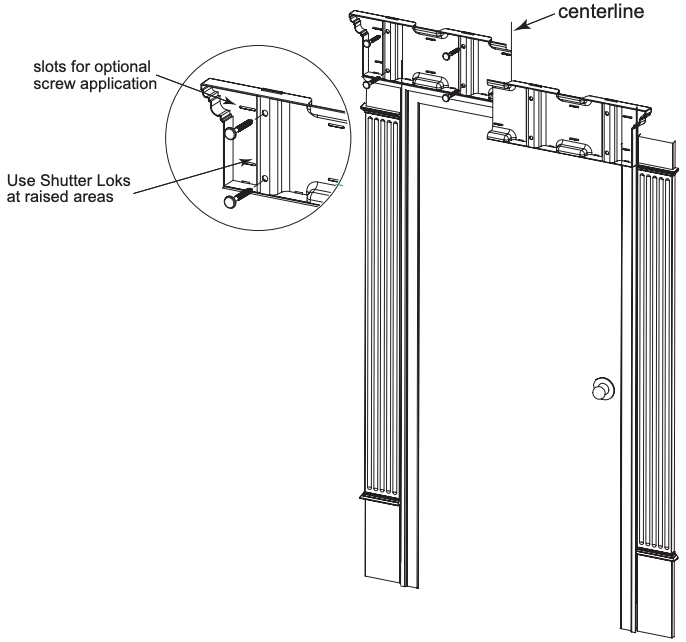
Place the remaining screws in the slots or drill 1/4" holes 2 1/2" deep into the wall to accept the Shutter Loks. Use the Shutter Loks only in the round holes molded into the raised areas of the Pilaster Base. See figure at right for locations. Do this for both sides of the door. The screws should be centered in the slot and not over tightened. The Pilaster Base must be able to expand and contract with changes in temperature.
Step 6
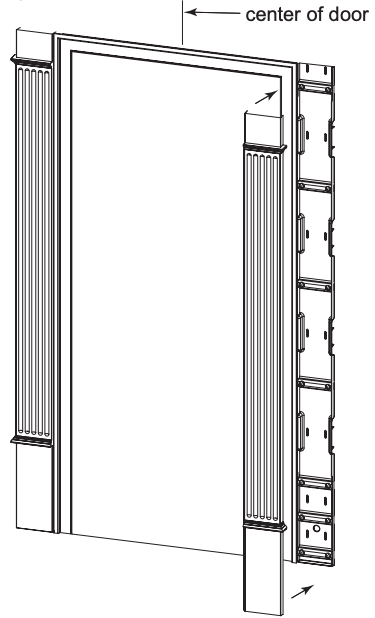
Snap the Pilasters over the Pilaster Bases. Be sure the locks of the pilaster are fully engaged. See figure at left
Step 7
Mark the center of the door with a vertical line. See figure at left.
Step 8
There are different ways to place the header on the door. See the figures on the next page.
Step 9
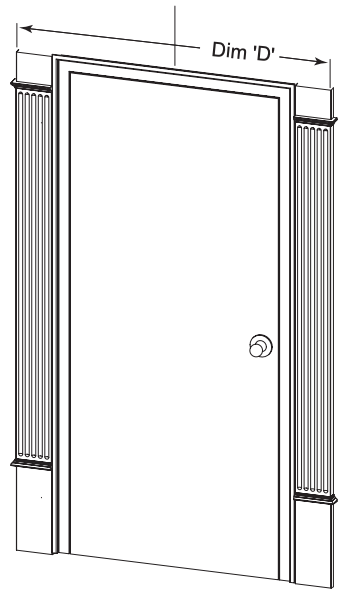
Measure the distance between the outside edges of the Pilasters and record this as Dim. 'D'. See figure at right.
Step 9A
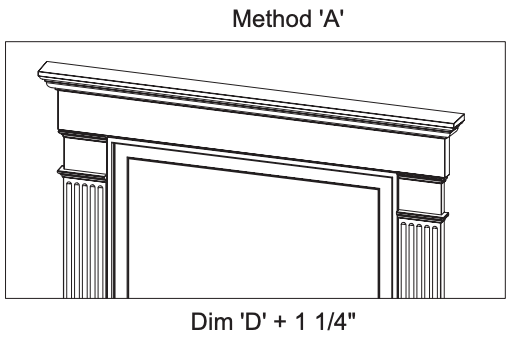
If you want your installation to look like Method 'A', you will need to add 1 1/4" to Dimension 'D'. This will allow the Header to be flush with the Transition Top when it's installed.
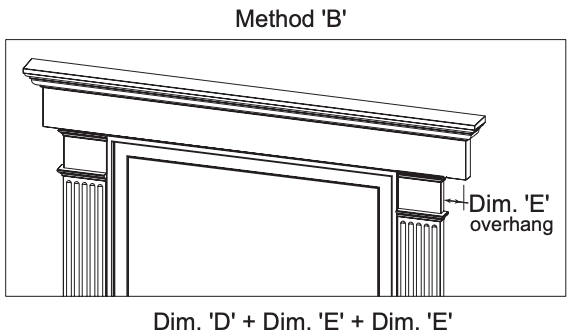
Step 9B
If you want your installation to look like Method 'B', you will need to add the amount of overhang you want. Be sure to multiply the amount of overhang by 2 when adding. You want the overhang on both sides of the door.
Step 10
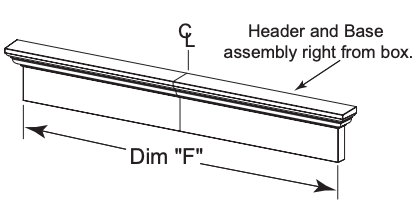
With the Header and Header Base assembled, mark the center of the assembly. See figure at left.
Step 11
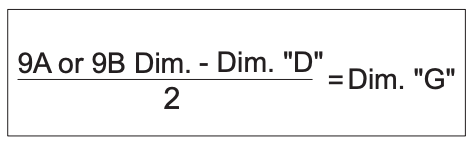
Next, subtract the dimension from step 9A or 9B from Dim. 'F' and divide the result by 2. This will give you Dim 'G'. See figure at right.
Step 12
Transfer Dim. 'G' to the Header Assembly. Dim. 'G' will be transferred 2 times; once on each side of the centerline.
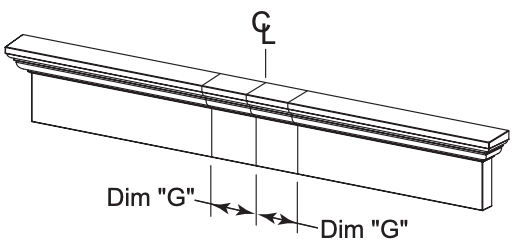

Step 13
Cut the Header and Header Base assembly at the lines created by Dim. 'G'. See figure at left.
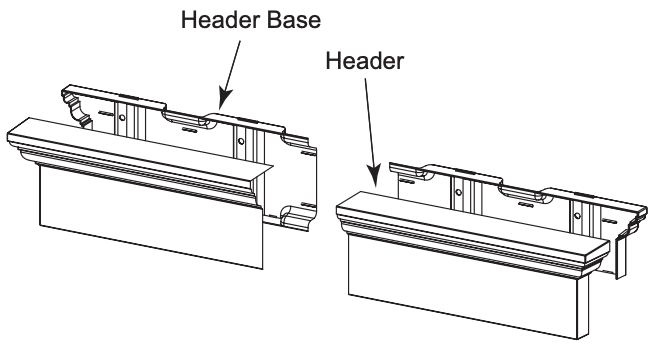
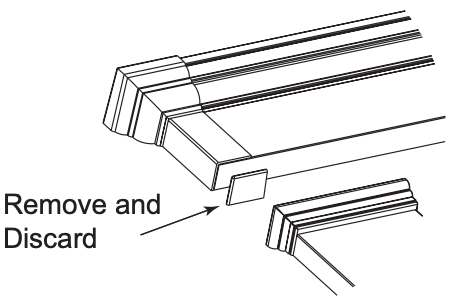
Step 14
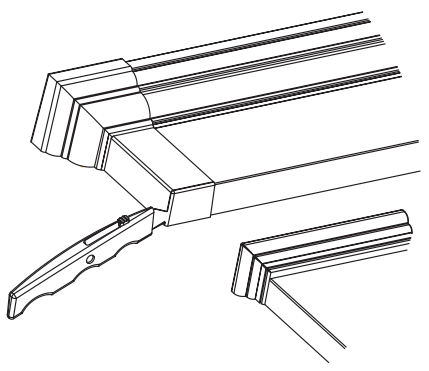
Once the Header has been cut to the correct length, disengage the locking tabs and remove the header from the Header Base. To release the locks, start at the open end of the cut Header Assembly and pull the wall of the Header away from the Header Base. Continue this process, working your way to the end of the cut Header Assembly. See figure at right
Step 15
Align the centerline of the door to the cut edges of the Header Base. Leave approximately an 1/8" gap between the bottom of the Header Base and the top of the door. This will give the Header clearance when snapped into place. When the Header base is properly located, fasten it into place. The preferred method of attaching the base to the house is to use the Shutter Loks that are enclosed with the kit. In order to install the Shutter Loks, 1/4" holes must be drilled 3" deep into the wall. Use the Shutter Loks only in the round holes molded into the raised areas of the Header Base. Space the Shutter Loks accordingly along the Header Base. See figure at right. Another method is to use screws. Use the elongated slot in the base and attach the base to the house using the screws provided with the kit. Be sure not to fasten the screws too tightly to allow for expansion and contraction.
Step 16
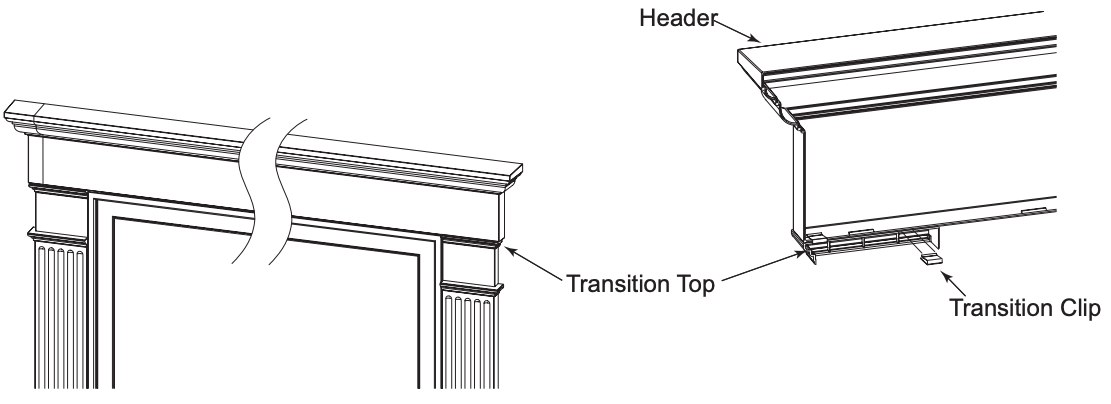
Place the Transition Top pieces on the Header in the approximate locations of the Pilasters. If the Header has the optional Endcaps welded on, use a utility knife to trim the bottom of the Endcaps so that the Transition Top pieces are flush. See figure at left. Clip them to the header using the clips provided. Use two clips per Transition Top. See figure below.
Step 17
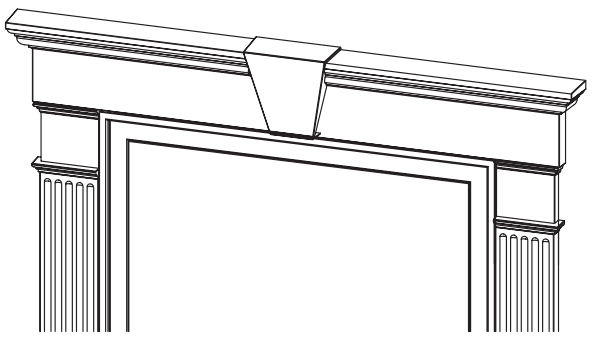
Snap the Header over the Header Base. At this point you may have to reposition the Tansition Top pieces so they line up correctly with the Pilasters. See figure below.
Step 18
Center the Keystone Base over the Header. The bottom of the Keystone Base and the bottom of the Header should be flush. Screw the Keystone Base into place using the enclosed screws. See figure at right.
Step 19
Snap the Keystone over the Keystone Base. Be sure the lock tabs engage. See figure at left.
Step 20
The back of the Bottom Corner Base has text to show the correct orientation for the left and right side of the door. Line up the bottom of the Bottom Corner Base with the bottom of the Pilaster. Screw the Corner Base to the Pilaster using the elongated screw slots for proper screw placement. See figure at right.
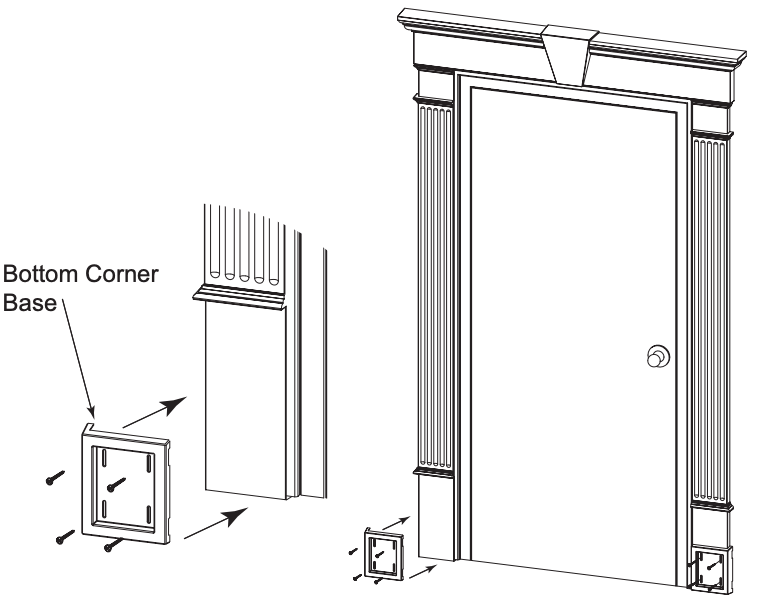

Step 21
Once the Bottom Corner Base has been securely fastened into place, snap the Bottom Corner over the Bottom Corner Base. Repeat the procedure for the other side of the door. See figure at left.